When digital marketers talk about how to maintain a brilliant business blog, we tend to focus on producing good written content. But, there’s a lot more to producing successful blog content than simply writing well (as crucial as it is).
In fact, visual content such as images, infographics and so forth are hugely important: blog posts that are published with at least one photograph generate 94% more views than blog posts without images.
As well as this, we know that imagery will draw in customers, keep their attention and even deliver some pretty big SEO benefits to your website. So, it’s essential that every single one of your blog posts is accompanied with at least one eye-catching image. And preferably more!
Here’s a complete guide to using images when you’re blogging for business. We’ll cover:
- Why you should use images in your blog posts
- Where to find images
- How to optimise images so they carry the most SEO benefit possible
Why should you use images in your blog posts?
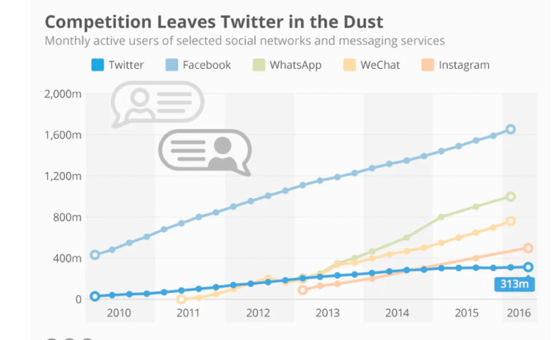
The fastest growing social media networks are Facebook, WhatsApp and China’s WeChat, all of which heavily rely on visual content. Couple this with the fact that the majority of us carry a smartphone in our pockets and use its camera to snap photographs when we’re out and about, and it’s no surprise consumers expect to be digesting visual content.
But why else should you be using imagery..?
Your message will stand out more clearly
Our brains process visual information more quickly than written information, so images can be useful of way of communicating key messages. For example, overlaying a photograph with key statistics or a quote that you want to stand out to your readers can be very impactful.
You’ll generate material for social media
As we’ve discussed in Volume 3 of The Ultimate Guide to Blogging for Your Brand, promoting your blog posts on social media is essential.
But for now, just focus on the fact that including imagery in your blog posts will ensure that, when it comes to clicking that sharing link, you’ll be pulling through images with every Facebook post, Tweet or Pin.
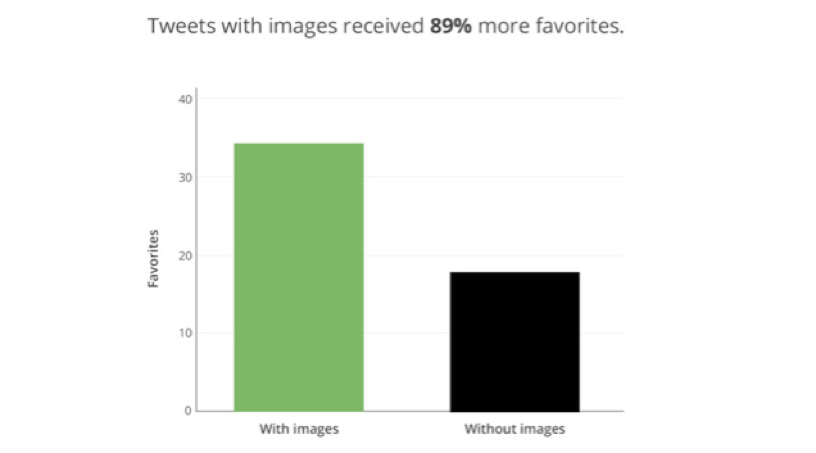
This is important given that Buffer found that its Tweets containing images received 89% more favourites than those that didn’t contain an image.
You’ll be giving your audience what they want
Your customers are increasingly busy, so if you want them to take time out to read your blog, you’ll need to make it easy for them. Images break up walls of text and allow readers to easily digest your writing, and if your images deliver the necessary information rather than asking visitors to read a lot of text? So much the better. Pictures are, in that respect, an efficient way of getting your message across.
You’ll trigger an emotion to associate with your brand
Images play a central role in communicating your brand values and the benefits you can offer your customers. A playful image can inspire feelings of joy or positivity, and hard-hitting images can inspire feelings of empathy and compassion; emotions that are then associated with your brand.
You’ll be doing yourself a favour on the SEO front
SEO for written content is something we talk about in Volume 1 and Volume 2 of The Ultimate Guide to Blogging for Your Brand, but there are lots of SEO benefits up for grabs where your images are concerned too.
For example, a relevant image surrounded by related text ranks better for the keyword it is optimised for, and a well-optimised image can help you to generate traffic from image search engines.
Where can you find images for your blog posts?
As you can see, there’s plenty of reason to invest a bit of time and effort including imagery in your blog posts. But getting your hands on a decent photograph is another matter altogether.
You might think you can use an image from anywhere on the internet, as long as you’ve credited the place you took it from. However, this isn’t true, and just because other businesses might be doing it doesn’t mean you should take the risk. After all – if your business hasn’t invested the time and money to develop, style, photograph and edit the images you want to upload to your blog, why should you get to benefit from someone else who has?
Some websites, photographers, stylists, designers or image-owners may be happy for you to use their image and simply give them credit and a link back. But, it’s not worth risking doing that without either written permission or seeing explicit terms and conditions. Look for Creative Commons licences – as these often allow for the use of images, provided you meet certain conditions.
What about doing a Google search?
If you only take one thing away from this post, let it be this: you should never just do a Google image search to find an image for your blog, or save an image from someone else’s website to use on your own. Doing so can bring about legal disputes and fines, so don’t go around lifting images from anywhere on the internet that you don’t have permission to use.
If you do find yourself doing a Google image search, be sure to only use the ones that say labelled for commercial reuse, or commercial reuse with modification (but only if you’re actually going to modify it in the way specified in the licence).
If you’d like to use someone’s image, reach out and ask their permission first; confirm the conditions under which they’re happy for you to use their images. Of course, reaching out for permission is a time-consuming process, and it can still be a grey area, legally speaking… so where else can you find images for your blog?
Create your own
Consider taking your own photographs if you can. If your business is large enough to pay for the time, materials and resources to take photographs of your own, you can develop a library of images to use over and over again, with no concerns over copyright.
Not only will you have 100% control and permission to do whatever you want with them, you’ll also enjoy the added benefit of ensuring your images are relevant to the material you’re writing, and you’ll also show consistency and a clear brand style by using images you’ve created in-house.
Moreover, by creating images of your own you’ll have an extensive library to draw on when you’re posting on social media.
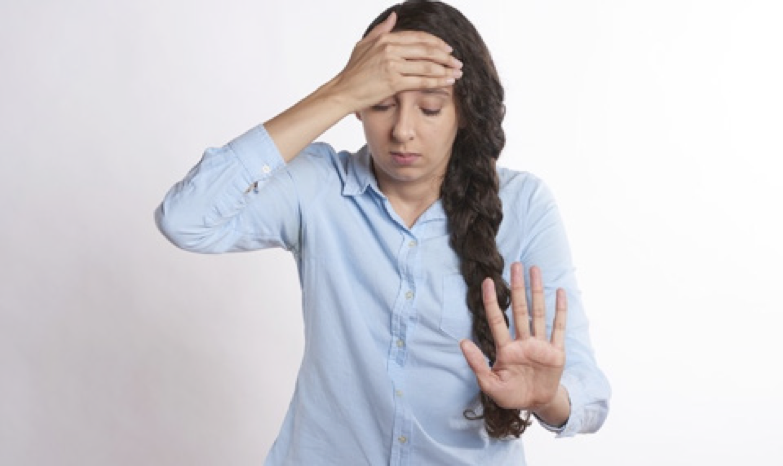
But, if nothing else, you’ll have avoided the pitfall of using cringeworthy stock imagery from elsewhere that appears insincere or contrived, like, er, this…
Access a database
Creating your own images can be an expensive and time consuming process. So, it can make sense to source images externally by hiring a freelance photographer or by downloading them from online databases.
If you’d like to go down the online database route, you should attribute the photographs (which just means telling your customers where you found the image and who photographed it, if possible) in almost every case, and never pretend you or your brand created the image yourself. Again, read the terms and conditions carefully and ensure you are free to use these images commercially.
Here’s where to look
Shutterstock – this is the only source in this list that you’ll have to pay for, but you can find lots of very good photos on here if you’re prepared to spend some money. You can pay for different levels of access and use, but be sure to read up on the terms of use first; being a business blog means you’re using these images for commercial use, so bear that in mind.
Pixabay – there are almost one million free photos, vectors, art illustrations and videos on this site, and you can use them all for your business blog without needing to give attribution.
Unsplash – this is one of my favourite resources as the library is extensive and the photographs are always of high quality. You can copy, modify and use the photos for free, including for commercial purposes (that’s the important bit for you), without asking permission from or providing attribution to the photographer or Unsplash.

SplitShire – there are thousands of free photos up for grabs, and it works in the same way as Unsplash does.
Pickup Image – if it’s travel specific photographs you’re looking for, check this site out. You can copy, modify and use these photos for commercial purposes without asking permission first, and they’re all free.
Death to the Stock Photo – if you want free images that are way less run of the mill than those ‘people in business suits’ photographs, you should check this site out. Just review the licence terms before you go ahead and use them.
Magdeleine – its choice of photos is more limited than other sites, but the images are of a high quality and they’re all free. You can choose between images that are in the public domain or those that simply require attribution, so read up on the terms of use first.
Gratisography – these free images are pretty quirky and are photographed by Ryan McGuire. They’re free of copyright restrictions and you can use them for commercial purposes without attribution.
It’s worth remembering, however, that the terms and conditions on these sites can change at any time. So, always check what the usage terms are before you start downloading images.
Finding images online
What if you come across a photographer’s website or another site that has exactly the kind of images you’re looking for? Well, you can contact them to see if they’ll let you use them for your blog and social media posts.
But, you’ll need to put in the hours to find good sources, reach out to them to obtain their written permission, specify the conditions under which you want to use them and how you’ll credit them, and be sure to credit all sources involved (i.e. owner of photo, photographer, stylist if relevant etc.).
This option isn’t off the table, but tread carefully and be prepared to pay.
How can you make the most of the images you’ve sourced?
Once you’ve found good quality photos and you’re confident you’re allowed to use them, the fun begins! Here are some top tips for making the most of images in your blog posts…
Use relevant and meaningful images
As the old adage goes, a picture is worth a thousand words. So, be sure to pick something that actually reflects or enhances the subject matter of your blog post. Doing this will ensure that you deliver a strong message, build trust with your customers (it’s confusing to read a post with a completely unrelated image), and could also earn you some SEO benefit.
Be mindful of your brand guidelines
The images you select must reflect your brand guidelines in terms of image quality, colouring, filters, composition and so on – but they must also reflect your brand’s values too. So, beware of anything that could be offensive, insensitive or inappropriate.
Use realistic images where possible
Stock photography can be awful. Truly, truly awful! At best it looks lazy, but at worst it looks as though your business isn’t maintaining its integrity (it’s obvious that these awkward models are not your employees) or any clear direction when it comes to branding. So, be careful if you’re using generic stock photos of people in suits, and try to use images that actually reflect your workplace, product or service wherever possible. ‘Fun’ images could distract the reader or undermine the overall message you are trying to convey.
Don’t overdo it
No-one likes to read a wall of text, but too many images on a page can have the same effect. Space your images out between paragraphs of relevant text, let the page have enough blank or ‘white’ space so your reader feels they have room to concentrate - we look at the best ways to optimise the white space and general design of your website in our blog post on Conversion Centred Design. Also try to use images that aren’t moving – GIFs are fun on Twitter, but can be distracting on a blog if the circumstances don’t lend themselves to this.
Consider loading time, file size and resolution
Loading time: This is an important part of ranking highly in Google – the faster your blog loads, the higher Google will ‘score’ it as your visitors won’t have to hang around too long (or bounce off in search of content on a faster-loading site). Your images can have a huge impact on loading times, so make the effort to scale your images to exactly the size you want to display them at. You’ll need to invest in basic image editing software to do this, or you can use a free compression tool online to ‘strip away’ any information about the image that your blog simply doesn’t need.
File size: The larger your file size (e.g. 2MB), the longer it will take for your website to load. This isn’t just bad news for SEO, it’s bad news for business too: one study estimates that for every extra second of page-loading time, Amazon could lose $16 billion in sales each year.
Resolution: As well as factoring in things such as loading time and file size, you should be thinking about the resolution of each of your images. Best practice is to ensure each of your images is as large as it needs to be to fill the space on your blog, and no larger.
Just make sure your resolution isn’t too low for the space available on your blog. Getting the ‘ratio’ right when you’re compressing images is important, as poor resolution is a real turn-off for customers: using an image that’s blurry, has jagged edges or has pixelated in parts is worse than using no image at all as it suggests your brand isn’t committed to delivering high quality content, products or services.
So how can you ensure you’ve balanced loading time, file size and resolution for all your blog images? Simply invest in compression software, or use an online tool such as TinyPNG or TinyJPG. Taking this step before uploading images onto your blog will mean you’re uploading images at the smallest file size possible without losing image quality.
If there’s any lack of quality once you’ve optimised your images, choose another one. You don’t want to risk your blog looking unprofessional.
Pay attention to DPI and RBG vs CMYK
DPI (dots per inch) also influences loading time for your blog, and might be relevant to you if you plan on using existing product photography taken on an SLR camera, intended for print publication (for example).
Print images tend to be 300 DPI, but it’s not necessary to upload an image with such a high DPI for your blog. 72 DPI is the optimum quality for websites. Similarly, make sure you’re using RBG (red, blue, green) files rather than CMYK (cyan, magenta, yellow and key) files, as the former is best-suited for websites (they’re typically a lot brighter) whereas the latter are designed for print publications.
Choose the right file type
This far into the process, you’ve probably noticed that some of your files end in a ‘jpeg’ extension whereas others end with a ‘png’ extension. Make sure you’re uploading the right kind of file to your blog:
JPEG – best suited for photographs. It stands for ‘joint photographic experts group’, and it’s likely to be the format your images are saved in if you’ve downloaded them from a database. If you’re photographing your own images, be sure to save them as JPEGs before uploading them to your blog.
PNG – best suited for illustrations and basic line drawings. It stands for ‘portable network graphics’, and it’s great for internet graphics as it supports transparency in browsers.
GIFs – perfect if you want a moving image without having to upload a file in a video format. It stands for ‘graphics interchange format’ and it’s ideal if you want a moving image on your blog that isn’t a big file.
Make the effort to name images correctly
Once you’ve sorted out the size and ‘weight’ of your images, it’s time to ensure your images are correctly named. The reason you should take the time to rename every photo you load onto your blog is that doing so ensures Google knows what the image is about, improving your potential ranking with the search engine.
For example, if your image is a man working out in a gym, the file name shouldn’t be photo-1508215885820 -4585e56135c8.jpeg, but gym-workout-man.jpeg instead. Try to put your keyword at the beginning of the file name.
Incorrect:

Correct:
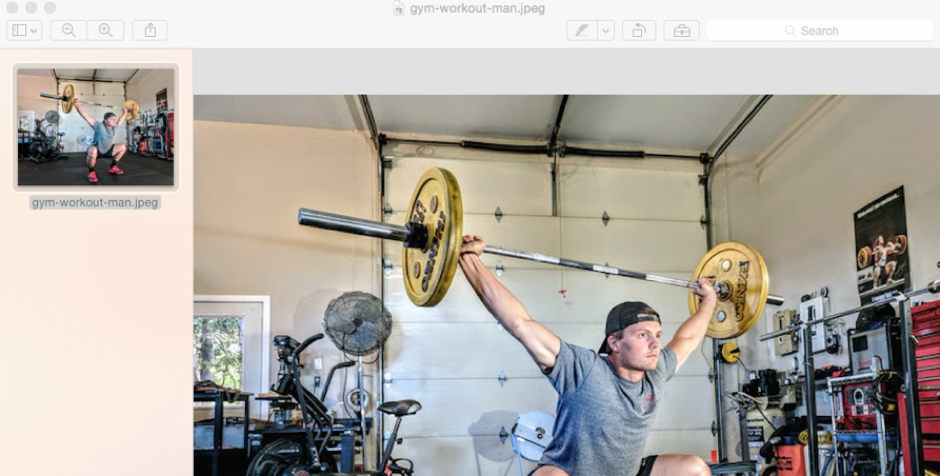
Making this extra effort gives you a chance to use keywords in your images, and increases the likelihood a reader will stumble across your business’s blog when searching for that keyword.
Learn how to write alt-tags
Alt-text (sometimes referred to an alt-tag) is something you must take the time to write when it comes to using images in your blog. The purpose of alt-text is to let the customer (and their computer) know what the image is supposed to be if the image itself cannot be displayed. It also provides alternative information for a customer if they are visually impaired as the text is read out via a screen reader.
Google places relatively high value on alt-text. That’s because it ensures everyone can ascertain what the image is trying to communicate, and it also helps to determine the topic of the surrounding text.
So, be sure to include your main keyword for the blog post within the alt-text of the image you’re using (so long as the image is relevant), and use the rest of the alt-text to describe the image. Using the example of the man working out above, the alt-text might read something like “A man working out at a gym”.
Use ‘scrset’ if possible
It’s also worth using scrset in your code, if you can. Scrset is an attribute that allows you to specify the image that is shown for different screen-sizes, orientations and display types (something that’s very important given that more people access the internet via their mobile phone than desktop). This is a task to talk to your web developer about, so don’t worry if you don’t quite understand what it means, what it looks like or how to implement it.
Include images in your XML sitemaps
Finally, make sure your XML sitemap is helping Google to index your images if you want them to be useful for SEO purposes. This will mean either using a separate sitemap to list the images on your blog, or adding image information to an existing sitemap. Again, this is likely to be a task you’ll need to give your web developer, but it is important to be aware of this step and to be able to ask the right questions.
Key takeaways:
- More people will engage with your blog if you include imagery
- You should never just take an image you’ve found online and use it on your blog without prior permission – even if you credit it
- You’ll rank higher for keywords if you use relevant, well-optimised imagery
We’ve written a complete guide to blogging for your business. It covers all the basics, from understanding who your target audience is, where to get ideas from and how to use keywords, right the way through to writing tips and tricks, and how to promote your blog so that it has the most benefit for your business. You can download all three volumes of the eBook for free here:
Volume 2: The Key Ingredients for Creating Quality Blog Content
Volume 3: How to Make Sure Your Efforts are Rewarded
Stay in touch with the Zazzle Media family
Sign up for our monthly newsletter and follow us on social media for the latest news.