WordPress is one of the largest content management systems in the world, with around 34% of the entire web using its systems to power their sites. Whether it’s a blog, portfolio, eCommerce store or complete bespoke build, WordPress has an approach to nearly any product you wish to create and thanks to the endless customisation, if it isn’t out there already, you can probably build it yourself. But not everyone is a WordPress expert, so we've pulled together a list of twenty tips and hacks to help make the process of creating, developing and maintaining a secure WordPress site, just that little bit easier.
1. Use security plugin (All in One)
One of WordPress’ greatest flaws, in my opinion, is the increased number of security vulnerabilities. The basic fundamentals on expanding the core WordPress system stems from allowing users to create their own plugins and widgets or install somebody else’s. With so much trust in another developers' code it can be very easy for security issues to unexpectedly arise. A big recommendation is to install a security plugin from the very start of your WordPress build, this will help with overall security management of your site by offering a solution for all the safekeeping. A personal recommendation that I use on almost any site I create is All In One WP Security and Firewall, which offers an endless supply of security features and add-ons, most of which should probably already come prepackaged in WordPress.
2. Create a custom log-in page
The first feature I’m going to start with is fairly simple to implement and is provided by All In One WP Security and Firewall. The standard URL to access any WordPress backend is ‘/wp-admin’ after the URL, which is easy to remember and straight to the point. However, if it’s easy for you to remember, who else can easily access the login page to your website? A very simple way to block brute-force attacks, is to change the backend URL to something obscure and unique to you.
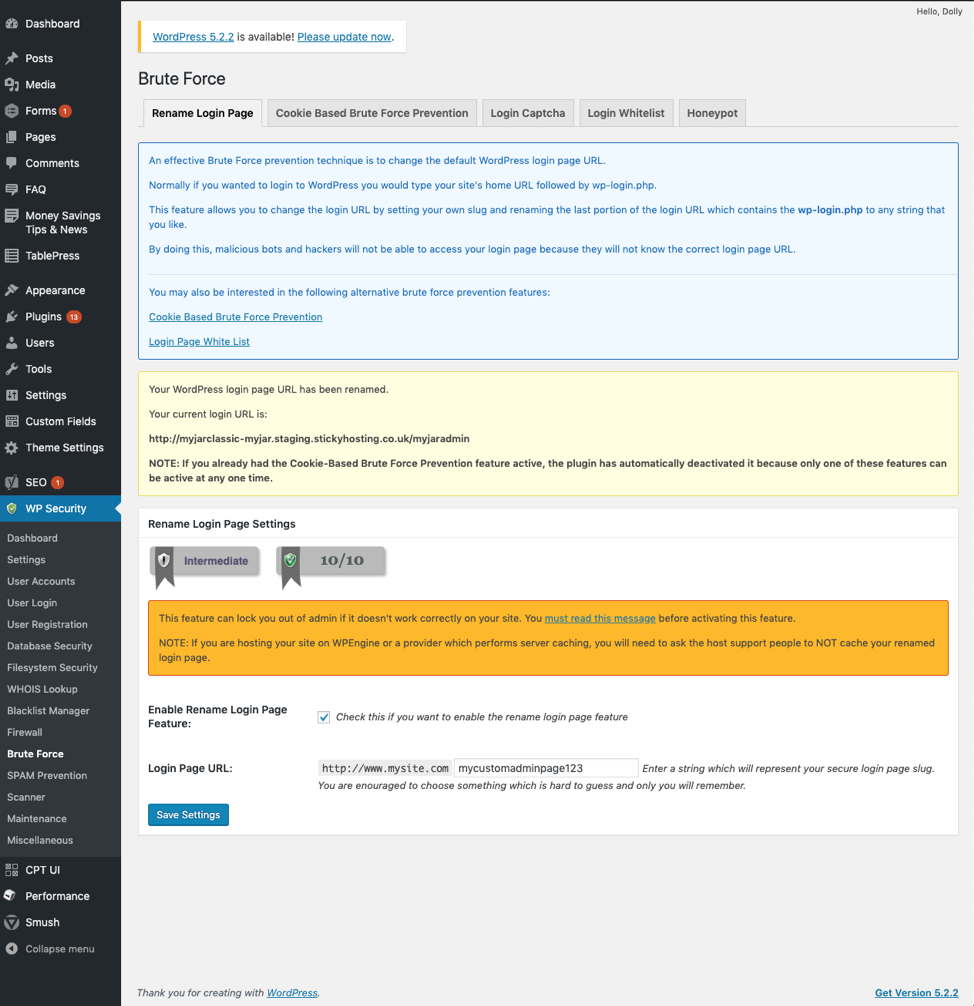
To change your backend login URL, you simply have to navigate to the Brute Force settings of All In One Security, tick the enable checkbox and scroll down to the input box titled ‘Login Page URL’, from here you can enter a custom string for your login page. Click the save settings button for your changes to go live.
3. Lockdown your login
Another great security feature offered by All In One Security is to enable the lockdown of the WordPress login page when you suspect it is under attack. The User Login settings page contains numerous features which can help secure your login page, even after creating a custom login url.
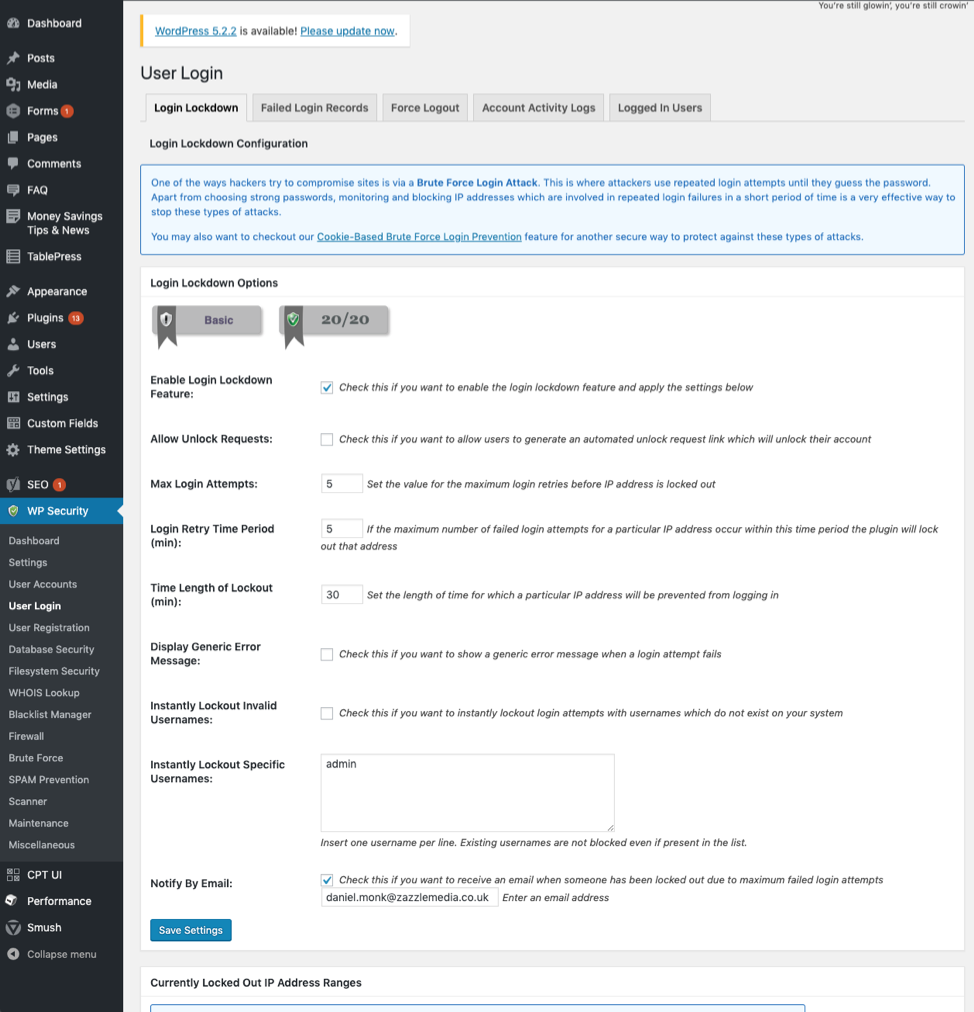
The features you should have enabled for locking down a login page are as follows:
- Firstly enable login lockdown to make sure the following settings will be active on the site.
- Followed by a max login attempts limit set to five, this makes sure that a user will only ever be able to attempt to log in to their account five times within the login retry time period set. After that, this specific IP will be temporarily locked out for the time period stated in the time length of lockout setting. I have set this to 30 minutes.
- Add an instant lockout for the specific username of ‘admin’. This is to add another layer of security due to this being a standard, easy to guess username of an administrator. Remember the first step is to make sure no accounts on your site are using this generic username and to make sure these are a lot more personal. Using default presets such as ‘admin’ or ‘administrator’ is a massive security flaw.
4. Disable WP login with email
A great little hack to add an extra layer of security to your site, is to disable the logging in with an email address and requiring the username itself.

This function can be added to your site by opening the functions.php file in your chosen code editor or within the WordPress admin panel and adding the above function. This will absolutely remove the ability to login with email, which just adds an extra level for hackers to breakthrough, so even if somebody’s email is known, a username would still be needed.
5. Hide WP login errors
Another great way of maintaining a high level of security on your WordPress site, is to disable the default error messages when attempting to login through the admin panel.
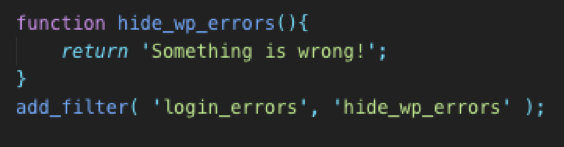
Adding the above function to your functions.php file, hides the default errors which unfortunately could offer guidance to those trying to gain access to the back end of your site. If a username or email is correct, WordPress will by default show an error message stating your password was incorrect, whereas if the username didn’t exist it would simply state that. Having such unintentionally helpful error notices can leave you in a state of vulnerability, so best to remove them and replace with 'Something is wrong!'.
6. Use Yoast SEO
Yoast SEO is the top WordPress SEO plugin and helps millions of users with a solid toolset that helps you enhance your sites SEO and push you up those rankings. Yoast SEO is packed full of features for both beginner and advanced users. By presenting them in an easy to use admin panel, it helps to massively reduce the amount of time these tasks take. A simple example of this functionality is creating an XML sitemap, available at the push of a button.Where some users may not feel comfortable being able to do this themselves, Yoast offers a quick and easy way to implement such a vital part of deploying your website. One of my main reasons for always making sure Yoast SEO is installed on all of my sites, is the ability to create page meta titles, descriptions and snippets incredibly easily.
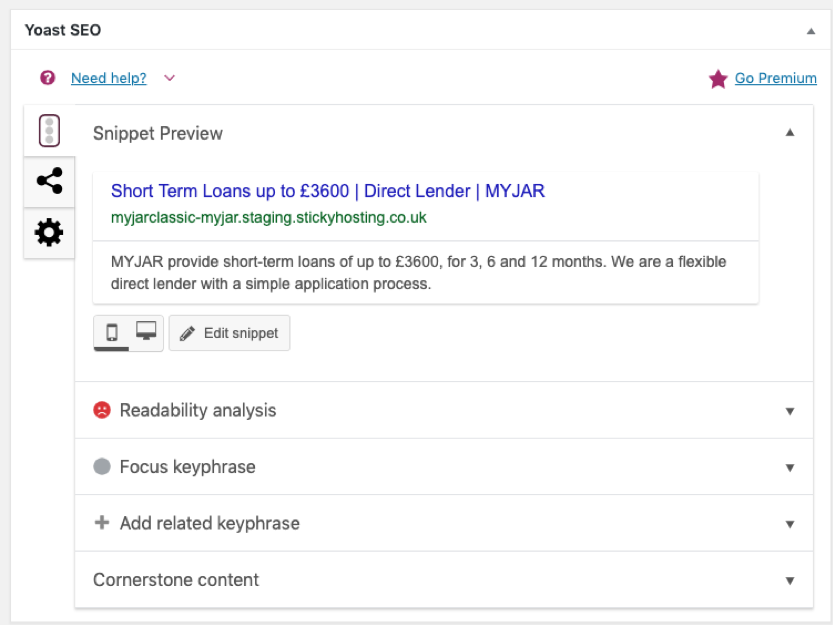
Here are the default settings for Yoast SEO, it gives a visual representation of what this specific page will look like on a search result, all of these options are automatically set by Yoast, but you also have the ability to override if it’s absolutely necessary. Without Yoast each meta title and description would need to be entered manually, however, with the plugin it is predetermined based on the content of the page, which when dealing with larger websites is a massive time saver.
7. Add breadcrumbs
Another great feature offered Yoast SEO, is the ability to add breadcrumbs throughout your site fairly easily with a vast amount of customisation allowing you reach a solution for any of your breadcrumb needs. In the below example we can see the breadcrumb is Home> Money Saving Tips & News > Loan Jargon Buster.

Breadcrumbs add another level of navigation to your nested pages, allowing the user to easily track their current location, in relation to other parent pages on your site. They are usually placed high up on the page and near the page title, they also feature links that can navigate the user further up their specific nested tree in relation to their current location.

The settings for breadcrumbs within Yoast are fairly extensive and offer enough customisation to change the separator between pages, the name of the link for the homepage, prefixes for archives, search pages and 404 pages, all of these are configurable through simple text boxes on the main Search Appearance settings page. You can also update the settings for any taxonomies you wish to be shown within the breadcrumbs, as well as styling updates including the option to bold the current page.
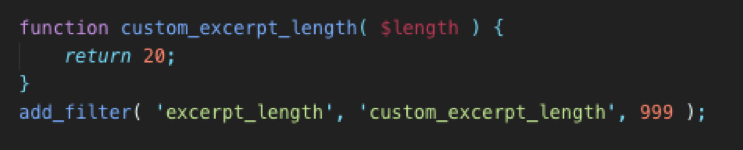
8. Change the lengths of excerpts
The default length of post and page excerpts for WordPress is 55 characters by default, sometimes you may need to change this globally or on a post/page specific level. There are a handful of different ways to do this, depending on your desired outcome. To change the excerpt length globally you can do this by adding the following to your functions.php file.
To create a more robust function that allows you to specify a custom excerpt length each time you call the function, you can use the following function in your WordPress functions file.
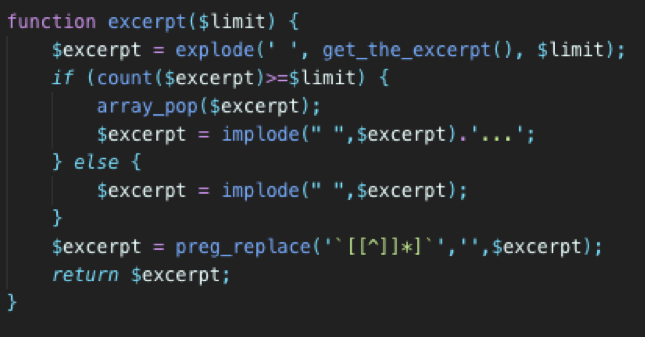
From then on, where you would usually call ‘the_excerpt()’, you can instead use ‘echo excerpt(55)’, where ‘55’ is the custom length of the excerpt you wish to show.
9. Create custom image sizes
WordPress is pretty good at handling images by default and comes with a handy image uploader that does a lot of the work for you, however, there may be times where you wish to include custom image sizes throughout your site; thankfully, with a few small lines of code, this can be incorporated into your WordPress theme.
You can do this by adding the above functions to your functions.php file, which is done as follows:
- Step 1: Open your functions.php file in your chosen code editor, or within the WordPress admin panel.
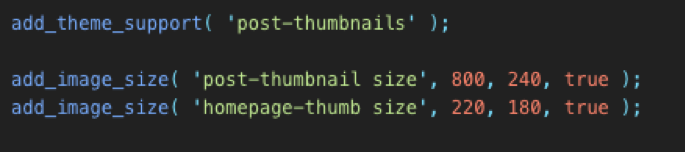
- Step 2: Add the following function ‘add_theme_support( ‘post-thumbnails’ );’ this enables the post thumbnail customisation so you can start to add custom image sizes.
- Step 3: Start to add your custom image sizes using the following format: ‘add_image_size( ‘post_thumbnails size’ 800, 240, true );’, where the parameters are the name, followed by width and height and finally a boolean parameter, dictating whether you wish for the image to be automatically cropped if the image uploaded doesn’t quite fit into the height/width parameters you’ve set.
- Step 4: Make sure you save your file for your change to be shown on your site.
10. Regenerate thumbnails
This next feature ties perfectly into the tip. For the custom image sizes to take effect on any pre-existing images you have uploaded on your site, you will need to use a handy little plugin called Regenerate Thumbnails.
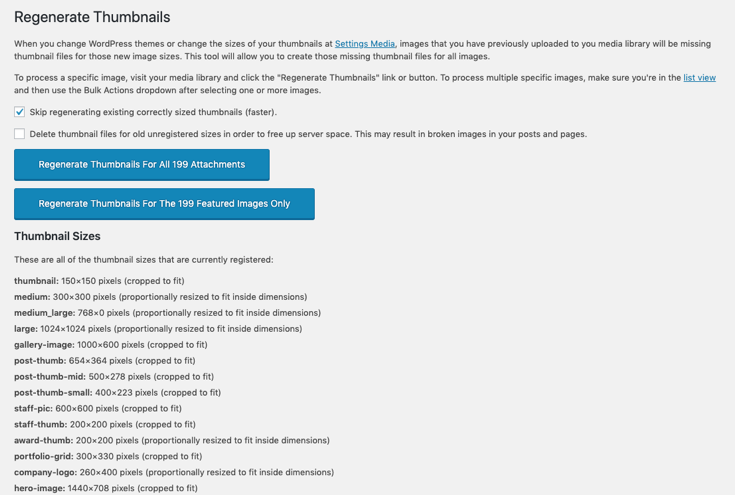
This plugin allows you to quickly regenerate all the images on your site, taking into consideration the new image sizes you have set. Doing this is an absolute necessity when making any changes to your custom image sizes, as the effects won’t be present on any existing images until this has been executed. You simply click the regenerate for all images button and let the plugin do its thing.
11. Custom user roles
WordPress has a default set of user roles you can apply to any of the users on your site, these roles are regimented and not very customisable. To further expand on this, a personal favourite plugin to use in these situations is User Role Editor.
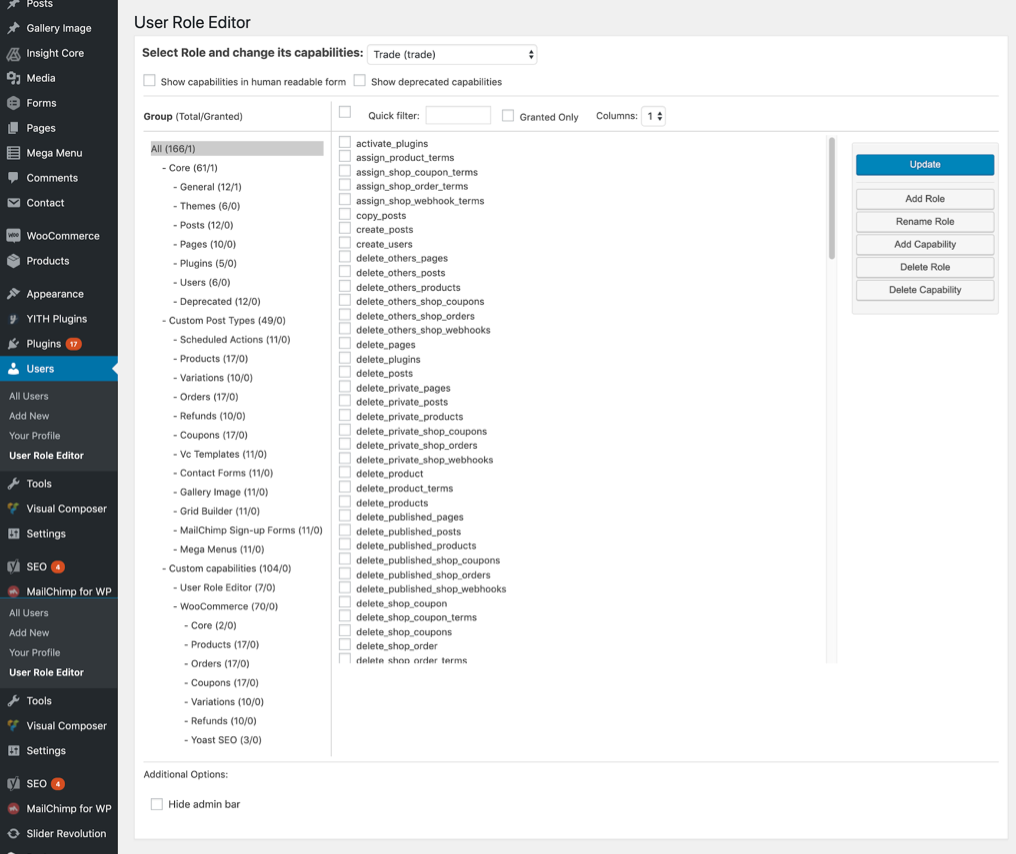
User Role Editor lets you customise absolutely everything about specific user roles and what permissions and limitations their account will have. This extends to being able to create or edit posts, add or edit images or even add and remove products if you are using something such as WooCommerce to run an eCommerce site. You can create edit roles that have been already created or go ahead and create new roles, the possibilities really are endless with this plugin.
12. How to disable the admin bar
A quick and easy tip here for removing the admin bar, for any user that isn’t an administrator. This bar can become incredibly annoying by covering a small area at the top of the screen, but luckily WordPress offers a quick and easy way to turn it off for each user.

To turn off this toolbar there is a simple checkbox within each user’s settings, this is ticked automatically. So, to turn this off simply uncheck this box. If you are using User Role Editor to manager users, this also has a checkbox, labelled ‘hide admin bar’.
13. Use WP Smush
WP Smush is a great free tool to help resize, optimise and compress all images on your WordPress site. By using lossless compression, you can strip unused data from your images, thus helping to reduce the file size without affecting image quality!
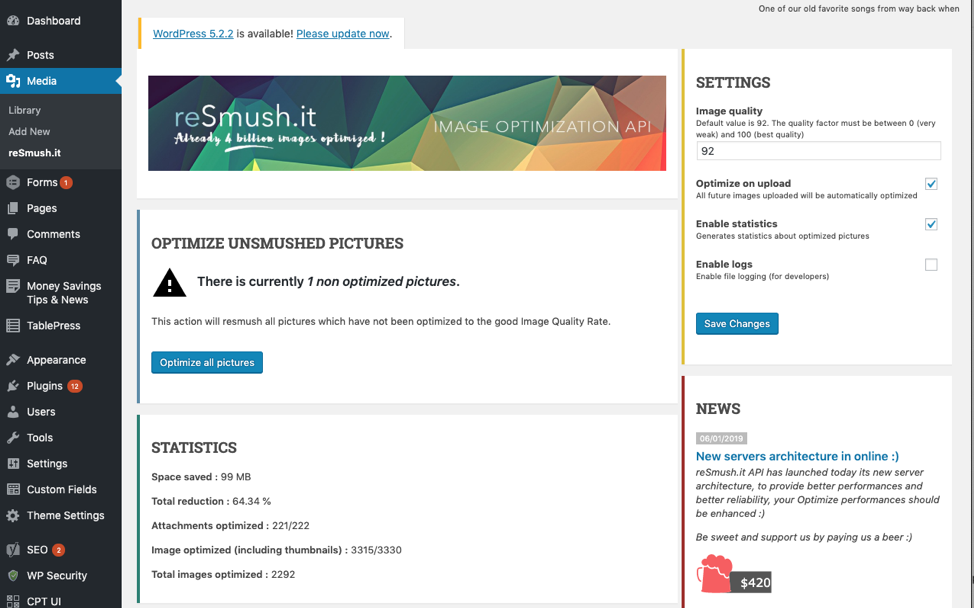
Once WP Smush has been enabled, you can adjust the settings to match your needs. I currently have 'optimise on upload' ticked and set the image quality to 92, from then on any image uploaded will undergo the Smush optimisation. There is also an option to force optimise all images within the settings, this will start to smush all images already stored on the site, which is great if you’ve installed the plugin at a later date.
14. Add new navigation menus
WordPress offers an excellent, simple menu interface that allows you to easily create new menus and add custom links wherever they need to go, however, what about custom menu locations? Luckily WordPress has incorporated a fairly straightforward function to create a custom menu location. Now, why would you need this? If you have a standard header menu and footer menu, you can create two separate menu locations to manage your menus through WordPress.
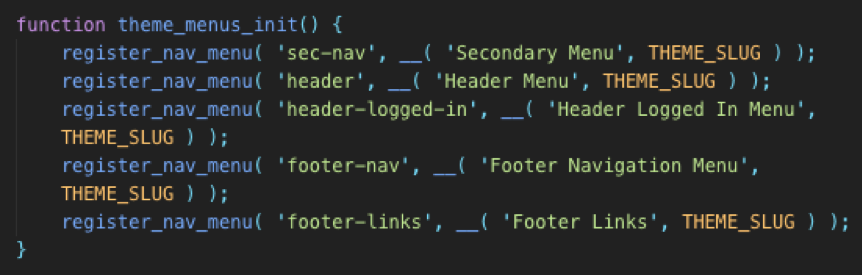
With these few simple lines of code I’m able to create five new menu locations with the function ‘register_nav_menu()’, with the arguments being menu location and description.
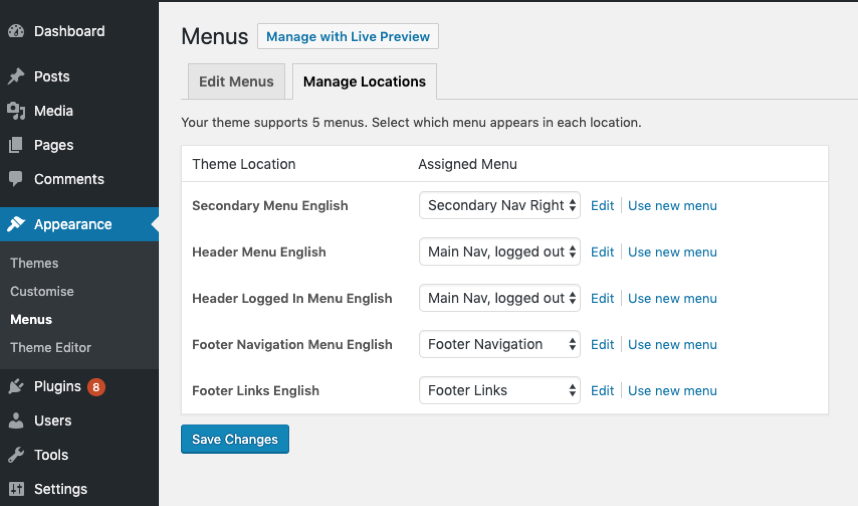
As you can see, now, when managing locations of the menus on my site I have the new menu locations which I have just created and can either create new menus to assign to these locations, or assign one that is already created.
15. Adding custom widget areas
Another handy tip to help build upon the core WordPress functionality is to create your own widget areas. These are interactive areas you can add to any of your pages throughout your WordPress site, most popularly used on sidebars, where you can add widgets such as category filters, menus, recent comments and search bars.
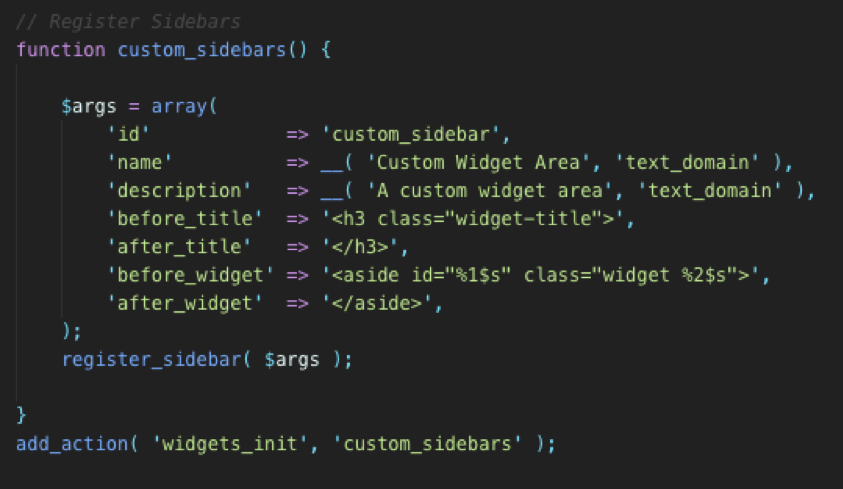
You can add the above code to your functions.php file, which again can be done either in your code editor or through the WordPress admin panel. By doing this you are telling WordPress to create a new custom widget area with the id of ‘custom_sidebar’, name of ‘Custom Widget Area’. The title will be wrapped in a H3 with the class 'widget-title' and each individual widget within this area will be wrapped in an ‘aside’ tag. Once you have registered the sidebar you’ll need to call ‘widgets_init’ on your specific id.
16. Add custom file types to be uploaded in WordPress
By default, WordPress only allows specific file types to be uploaded through the back end editor. Even though this is implemented for safety measures, and to make sure no malicious files are uploaded to your site, if you are 100% sure you wish to enable a specific file type to be uploaded you can do the following.
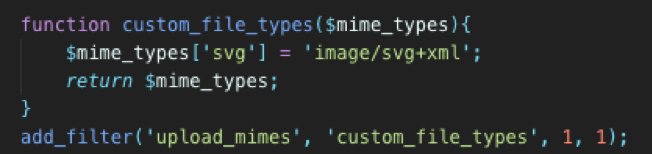
Add the above function to your functions.php file, which will allow the use of SVG images to be uploaded to your site. Whereas by default this file type is explicitly rejected when trying to upload to the WordPress backend. By declaring the mime type through the ‘upload_mimes’ filter, you are overriding the core functionality. For other file types you will need to investigate the mime type for that specific file, luckily they are all listed here.
17. Edit your permalinks
An absolute necessity of your WordPress knowledge is to be able to update the permalink structure of your site. By default WordPress gives you its ‘plain’ permalink setting, which structures your URLs as follows: http://yoursite.com/?p=123
This is not user-friendly in any way, but with a few clicks you can restructure your site for the better.
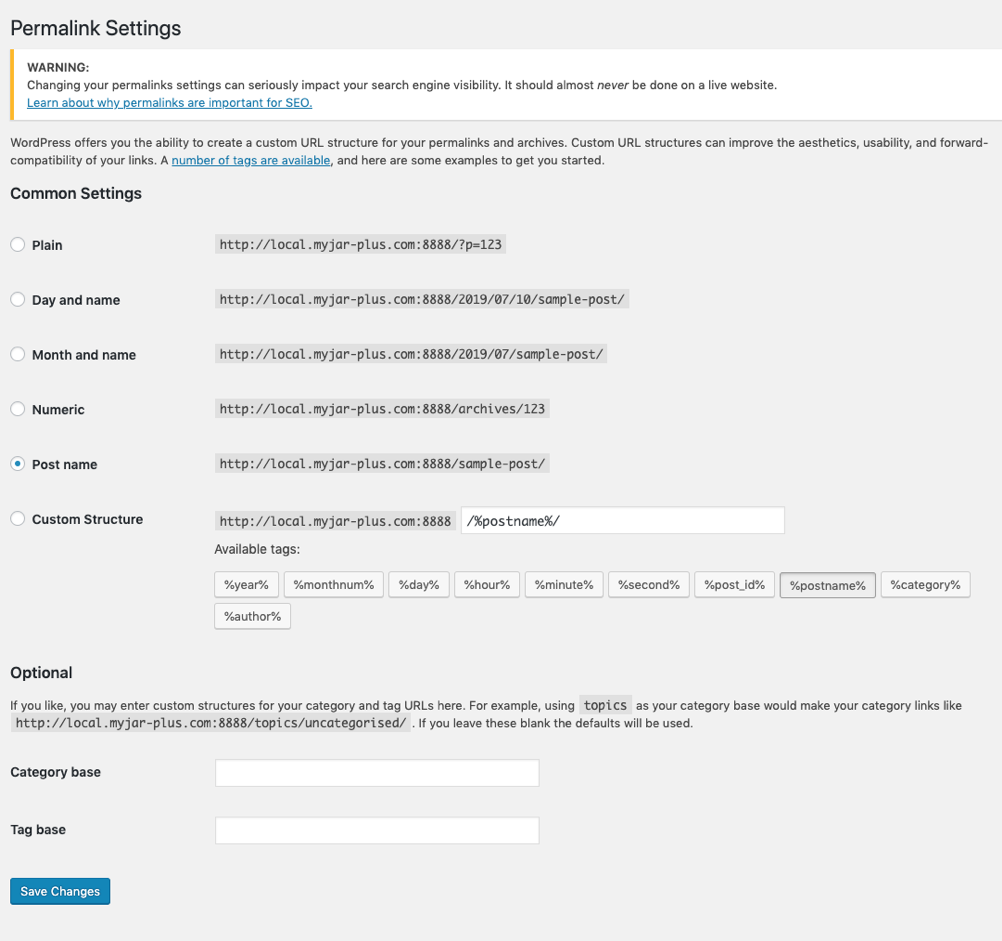
Whilst in development stage, this should be one of the first things you should do upon setup and should not be done on a live site. I have deselected the standard ‘plain’ permalink setting and have selected ‘Post name’, as you can see from the example where the previous link would have shown ‘/?p=123’ it is replaced by ‘/sample-post’.
18. Disable Gutenberg
With the release of WordPress 5.0 also came the release of a new core post editor titled Gutenberg, whilst many would say there was nothing wrong with the old editor, WordPress felt it was needed to push the biggest update ever for its page editor. The update was not welcomed with open arms by the WordPress community and has since been handed an overall rating of 2 out 5, with more than 2,800 votes. This has caused a surge of popularity for the plugin Disable Gutenberg. So, if the new editor isn’t your cup of tea, but you still wish to stay up-to-date and safe with your WordPress core files, you can simply install this plugin to revert the page editor back to exactly how it was before and never have to worry about updates in the future. The plugin is fully customisable, allowing you to toggle any of the new options as you see fit.
19. Increase/decrease maximum upload size
WordPress comes with preset values of maximum sizes for uploads, posts and a max execution time, although these implications have been set with security in mind, sometimes it is essential, depending on your sites intending functionality, to increase these limits. All of these are set pretty low if you’re working with some massive assets or files, thankfully these can easily be configured through a few lines of code.
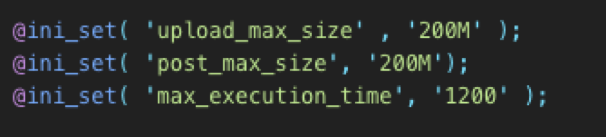
By adding the above few lines to your functions.php file, I’ve been able to update the default upload and post sizes from 64mb to 200mb, as well as increasing the maximum execution time from 30 seconds to two minutes. All of these collectively allow you to upload larger assets to your site, an example of this would be hosting large prospectus files as PDF’s that would otherwise exceed the initial limits.
20. Get a caching plugin
Adding a caching plugin can do wonders for your overall site performance and furthermore lead to improvements in search engine result page rankings. A personal recommendation that I have implemented on many sites and has massively increased the page speeds, is W3 Total Cache.
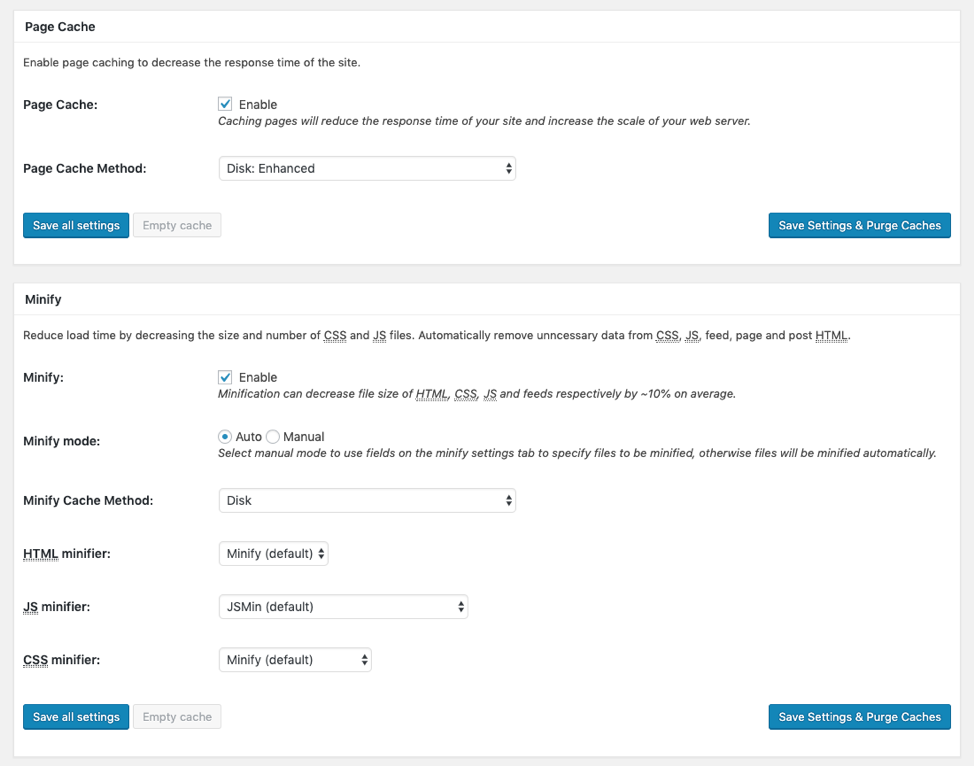
A few of the basic settings I have enabled within W3 Total Cache are as follows:
- Firstly to enable page cache so the plugin will acknowledge your other settings and get to work.
- From then on I have enabled minification of HTML, CSS and JS files, which if you haven’t done already is a quick and easy way to implement this, however, please bear in mind this is a very rough approach and proper minification should properly be done in the development process.
- I have also chosen my specific HTML, JS and CSS minifier, as well as setting the minify mode to automatic, which stops the need for specific files to be selected and will instead apply to all relevant files.
This plugin is a great start to getting your site speeds down by minifying any hefty files, but please remember when making any changes to save settings and purge caches for any changes to reflect on your live site.
Overall, with the use of these tips and tricks I hope that your knowledge of the core WordPress infrastructure has expanded and has helped familiarise you with common issues we've experienced, along with the quick fixes which help make WordPress that little bit better. Whether it’s site security, speed or bits of functionality that WordPress probably should incorporate, this list should help you tackle a vast amount of issues you may find within your WordPress sites in the near future.
Stay in touch with the Zazzle Media family
Sign up for our monthly newsletter and follow us on social media for the latest news.